Tools For Jewelry Making:
Welcome to Unexpected Wire Jewelry Tools, home of the unusual and often surprising everyday objects to use for wire jewelry making.
_______________________________________________________________________________________

Hi, I'm Lisa Van Herik, a metalsmith and art jeweler who specializes in wire jewelry making and creates original wire jewelry techniques and tutorials. This site is about finding out all about unusual and often overlooked everyday items to make wire jewelry making easier and more satisfying. If you haven't heard of me, please feel free to go to Woven Wire Studio to view my exhibit and reference wire jewelry or Beadifferent Press for wire jewelry tutorials and projects. Many of those pieces were made using some of the unique tools for jewelry making that you'll find here.
You're in for a few surprises as you go thru this site and will likely find yourself saying, "Now why didn't I think of that!"
As a wire art jeweler or even an aspiring one, no matter what your level of experience in making wire jewelry, you well know the problems faced in controlling and shaping the wire just the way you want to get it for your own wire jewelry pieces. You may have learned all about how to make wire jewelry from projects and tutorials but much of the time, those things won't guide you into the creative discovery of unique tools for jewelry making. Certainly not like the ones that you'll find here.
If you have any additions or suggestions for unexpected wire jewelry tools, please feel free to add your comments, etc. to the blog on this site. I'll happily share your ideas and give you credit for them as we can all benefit from knowing about them, thanks. You can contact me at [email protected]
_____________________________________________________________________________________________________
Plumb Bob, Metal Stake and Chopsticks
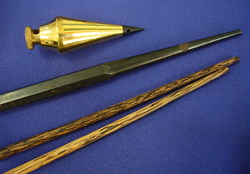
One of the best and easiest methods I've found (after years of wire smithing and teaching myself how to make wire jewelry) is to always keep my eyes open for things that I can successfully form wire around to make consistent bends in the wires. Hardware stores are a real adventure in this sense, often giving me some wonderful treats for wire jewelry making and forming. The plumb bob (the gold, cone-shaped item in the photo to the left) is a great example of that.
I was challenged several years ago to do a wire jewelry how-to article for one of the biggest jewelry suppliers, Rio Grande. For the necklace that I'd envisioned, I needed several different cone shaped wire beads. Frustrated with what tools I had available in my studio, I went to the hardware store and started going up and down the isles. I lovingly focused on the plumb bob although I knew that it would be hard to form a cone with it because the wire would be slipping all over the place on that metal surface. So, what did I do? I used masking tape all around the plumb bob to give it some "tooth" and then carefully and slowly wound my wire around it. Wasn't that easy but it worked well enough and gave me the many wide-bottomed wire cones that I needed for my wire jewelry project.
I was challenged several years ago to do a wire jewelry how-to article for one of the biggest jewelry suppliers, Rio Grande. For the necklace that I'd envisioned, I needed several different cone shaped wire beads. Frustrated with what tools I had available in my studio, I went to the hardware store and started going up and down the isles. I lovingly focused on the plumb bob although I knew that it would be hard to form a cone with it because the wire would be slipping all over the place on that metal surface. So, what did I do? I used masking tape all around the plumb bob to give it some "tooth" and then carefully and slowly wound my wire around it. Wasn't that easy but it worked well enough and gave me the many wide-bottomed wire cones that I needed for my wire jewelry project.
Necklace with Many Wire Cones
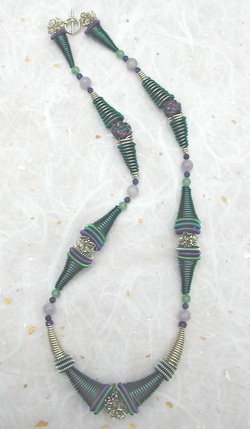
You can easily see that I needed several different shaped wire cones for this necklace. I really wanted short cones that had those wide bottoms like the centerpiece ones and that's what inspired my discovery of the plumb bobs. I still use them when needing just this type of wire effect.
Now, I've got to say that like many jewelry making ideas, this necklace didn't really turn out as I'd expected; it just more or less "grew" into what it became. That's often both the beauty and frustration of learning how to make wire jewelry: it just happens regardless of the idea you start out with. I was a bit hooked originally on the "cones inside other cones" idea as it had a bit of an Art Deco appeal to me. I was also promoting my book, Make Wire Beads, at the time and I think that's what threw me off of that whole "cone inside cone idea". I needed to make more wire beads for this piece.
In any event, the plumb bob did the trick for me although as I remember preparing to write this tutorial that I kept running out of the right gauge wires and was in a bit of a panic. Which, of course, led me to finding a couple of other ways of dealing with wire gauge shortage for future projects. One of the simplest things to do if you find yourself in a time crunch and needing thicker gauge wires is to combine two or three thinner gauge wires: twisting them together will often get you up to a thicker gauge wire or strand to use although it may be necessary to anneal the new strand because of work hardening. For those of you who don't know, "work hardening" refers to the stiffening of wire the more you use it. Metalsmiths will often then "anneal" or heat up the stiffened wire or metal with a torch to soften and make it malleable again.
So Many Places To Look And So Little Time
I originally started the idea for this website with a little over twelve or so ideas for tools for jewelry making that were out of the ordinary and unusual. It struck me that, of course, jewelry making tools can be quite expensive especially if you're a metalsmith. While I was originally trained as such, years of moving all over the country for business kept me from having immediate access to all the tools that I'd gotten used to using. I was more or less forced to get creative. Fortunately, my love of wire prioritized and so I could be content with using my simple wire tools for the most part. Inevitably though, I'd find myself writing a wire jewelry making tutorial or project that required a tool that I either didn't own or have access to. So I started going thru my house and studio looking for anything that would work as I needed it at the time. Challenge is the mother of invention.
In any event, as I started out looking for unusual tools for jewelry making in my kitchen, that's how we'll start here. Check the tabs above as we take an adventure thru both your and my houses and studios.
In any event, as I started out looking for unusual tools for jewelry making in my kitchen, that's how we'll start here. Check the tabs above as we take an adventure thru both your and my houses and studios.
